


GraphQL is a powerful query language for APIs that allows developers to request and receive the data they need efficiently. In this step-by-step guide, we will walk you through the process of building a GraphQL API using Node.js, using airport data as a sample for the demo. Whether you're a beginner or an experienced developer, this tutorial will provide you with the necessary knowledge to easily create your GraphQL API.
The demo source code can be found here:
Prerequisites
Node.js installed
Text Editor
Basic JavaScript/NodeJS knowledge
Creating a Node.js Project
We will create a new project folder and initiate a Node.js project. Open the project on a terminal (or a CLI application). To initialize a new project, run the command:
npm init -y
The command will create a package.json file with basic content for a Node.js application.
After that, we will need to install the dependencies for the project:
To install the dependencies, use the command:
npm install express graphql express-graphql
Creating a Schema
In GraphQL, a schema describes how your data will be structured. It defines the types, fields, and relationships between them.
Create a new file: schema.js, and add the code below:
const { buildSchema } = require('graphql')

const schema = buildSchema(`
    type Airport {
        name: String
        latitude: Float
        longitude: Float
    }

    type Query {
        airports: [Airport]
        airport(name: String!): Airport
    }
`)

module.exports = schema
This schema defines an Airport type with three fields:
name
latitude
longitude
    type Airport {
        name: String
        latitude: Float
        longitude: Float
    }
It also defines two queries: airports, which returns an array of all airports, and airport, which takes a name argument and returns a single airport with that name.
Creating a Resolver
In GraphQL, a resolver is a function that queries an API and returns results.
Create a new file called resolver.js and define your resolver there:
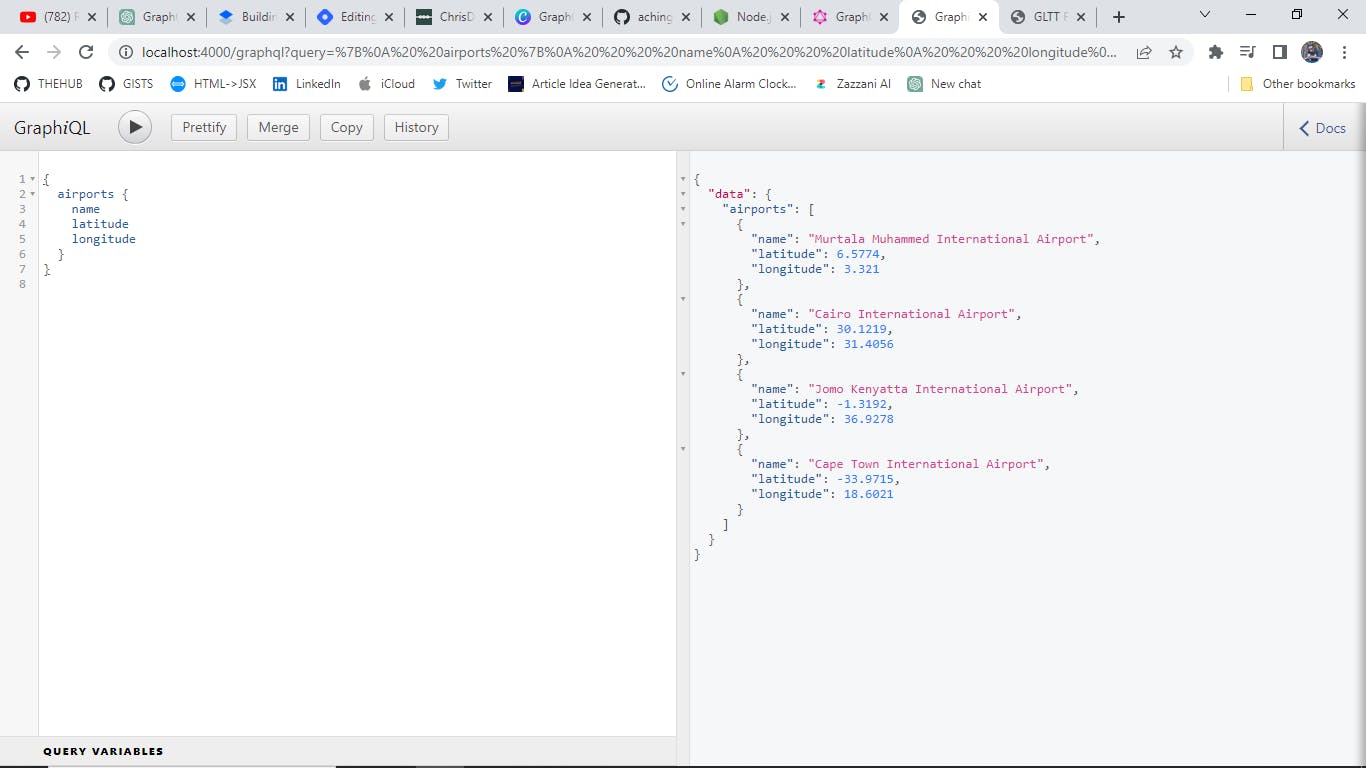
const airports = [
  {
    name: 'Murtala Muhammed International Airport',
    latitude: 6.5774,
    longitude: 3.321,
  },
  {
    name: 'Cairo International Airport',
    latitude: 30.1219,
    longitude: 31.4056,
  },
  {
    name: 'Jomo Kenyatta International Airport',
    latitude: -1.3192,
    longitude: 36.9278,
  },
  {
    name: 'Cape Town International Airport',
    latitude: -33.9715,
    longitude: 18.6021,
  },
]

const resolver = {
  airports: () => airports,

  airport: ({ name }) => {
    return airports.find((airport) => airport.name === name)
  },
}

module.exports = resolver
This resolver implements the airports and airport queries and returns the data for those queries.
In this case, we use a hardcoded array of airports for the data.
Creating an Express App
Express is a web framework for Node.js. Create a new file called app.js and define your express app there:
const express = require('express')
const graphqlHTTP = require('express-graphql').graphqlHTTP

const schema = require('./schema')
const resolver = require('./resolver')

const app = express()

app.use(
  '/graphql',
  graphqlHTTP({
    schema: schema,
    rootValue: resolver,
    graphiql: true,
  })
)

app.listen(4000, () => {
  console.log('GraphQL API running on http://localhost:4000/graphql')
})
The code above sets up an express app that listens on port 4000. It also creates a /graphql route that handles GraphQL queries.
The graphqlHTTPmiddleware takes a schema and a resolver as arguments and returns a function that can be used as a route handler.
Start your server: Run node app.js to start your server. You should see a message in your console that says GraphQL API is running on localhost:4000/graphql.
Test your API: Open your browser and go to localhost:4000/graphql. You should see the GraphiQL interface
Conclusion
The article has covered a step-by-step process on how to create a simple GraphQL API using Node.js.